Using Cynthion USER I/O with Facedancer

In addition to the four USB ports Cynthion also includes the following user i/o ports:

Apart from PMOD B, which is used for the Facedancer SoC UART and JTAG interface, all of these can be accessed from within Python Facedancer devices.

Before proceeding, please ensure you have completed all steps in the Getting Started with Cynthion and Using Cynthion with Facedancer sections.

Requirements

  • A Cynthion running the Facedancer bitstream.

  • Two USB Cables.

Using Cynthion APIs

To access Cynthion USER i/o using Python you first need an instance of the Cynthion object, which can be created as follows:

from cynthion import Cynthion
c = Cynthion()

Once you have a Cynthion instance you will be able to access USER i/o using the leds and gpio APIs.

For example, open a new Python shell:

$ python

Python 3.11.11 (main, Feb 12 2025, 14:40:14) [Clang 16.0.0 (clang-1600.0.26.6)] on darwin
Type "help", "copyright", "credits" or "license" for more information.
>>>

First obtain a Cynthion instance:

>>> from cynthion import Cynthion
>>> c = Cynthion()

Turn on USER Led5:

>>> c.leds[5].on()

Turn off USER Led5:

>>> c.leds[5].off()

Toggle USER Led4:

>>> c.leds[4].toggle()

Get the USER Button:

>>> user_button = c.gpio.get_pin("USER")

Wait for the USER Button to be pressed: (hit enter twice to start)

>>> while user_button.read() == False: pass
...

Using USER Button and Leds with Facedancer

Lets modify the Facedancer rubber-ducky example to give us a bit more information and control using Cynthion USER i/o. We’ll subclass a Facedancer device and add some calls to the USER i/o APIs in response to host requests and device responses.

Create a new Python file called facedancer-user-io.py and add the following content:

facedancer-user-io.py
 1import asyncio
 2import logging
 3
 4from facedancer                   import main, errors
 5from facedancer.devices.keyboard  import USBKeyboardDevice
 6
 7from cynthion                     import Cynthion
 8
 9# Subclass USBKeyboardDevice
10class MyKeyboardDevice(USBKeyboardDevice):
11    def __post_init__(self):
12        super().__post_init__()
13
14        # Get a Cynthion instance.
15        cynthion = Cynthion()
16
17        # Get USER Leds
18        self.leds = cynthion.leds
19
20        # Make sure all USER Leds are off
21        [led.off() for led in self.leds.values()]
22
23        # Get USER Button
24        self.user_button = cynthion.gpio.get_pin("USER")
25
26    def handle_bus_reset(self):
27        # Strobe USER Led0 every time we see a bus reset
28        self.leds[0].strobe(duration=0.1)
29        super().handle_bus_reset()
30
31    def handle_request(self, request):
32        # Strobe USER Led1 every time the host makes a control request
33        self.leds[1].strobe(duration=0.1)
34        super().handle_request(request)
35
36    def control_send(self, endpoint_number, in_request, data, *, blocking = False):
37        # Strobe USER Led2 every time the device responds to a control request
38        self.leds[2].strobe(duration=0.1)
39        super().control_send(endpoint_number, in_request, data, blocking=blocking)
40
41    def handle_data_requested(self, endpoint):
42        report = self._generate_hid_report()
43        endpoint.send(report)
44
45        # Strobe USER Led3 every time the host requested a HID report descriptor from the host
46        if report[2] == 0:
47            self.leds[3].strobe(duration=0.1)
48        # Strobe USER Led4 if the report descriptor contained a scancode for the host
49        else:
50            self.leds[4].strobe(duration=0.1)
51
52# Rubber-ducky control script
53async def type_letters():
54    # Wait for device to connect
55    await asyncio.sleep(2)
56
57    logging.info("Press the USER button to proceed.")
58
59    # Wait until Cynthion's USER button is pressed
60    while device.user_button.read() == False:
61        await asyncio.sleep(0.01)
62
63    logging.info("Typing string into target device.")
64
65    # Type a string with the device
66    await device.type_string("echo hello, facedancer\n")
67
68    logging.info("Finished. Press the USER button again to quit.")
69
70    # Done
71    while device.user_button.read() == False:
72        await asyncio.sleep(0.01)
73
74    raise errors.EndEmulation("User quit the emulation.")
75
76# Start emulation
77device = MyKeyboardDevice()
78main(device, type_letters())

Open a terminal and run:

python ./facedancer-user-io.py

If everything went well you should see prompts at various points to press the USER button to continue execution as well as the USER Leds flashiing in response to device events.

USER Pmod inputs and outputs

In addition to the USER Button and Leds, Facedancer can also make use of Cynthion USER Pmod A (USER Pmod B is used for JTAG and UART duties) to trigger or respond to external hardware. They use the same gpio APIs as the USER Button but individual pins can also be configured as inputs or outputs.

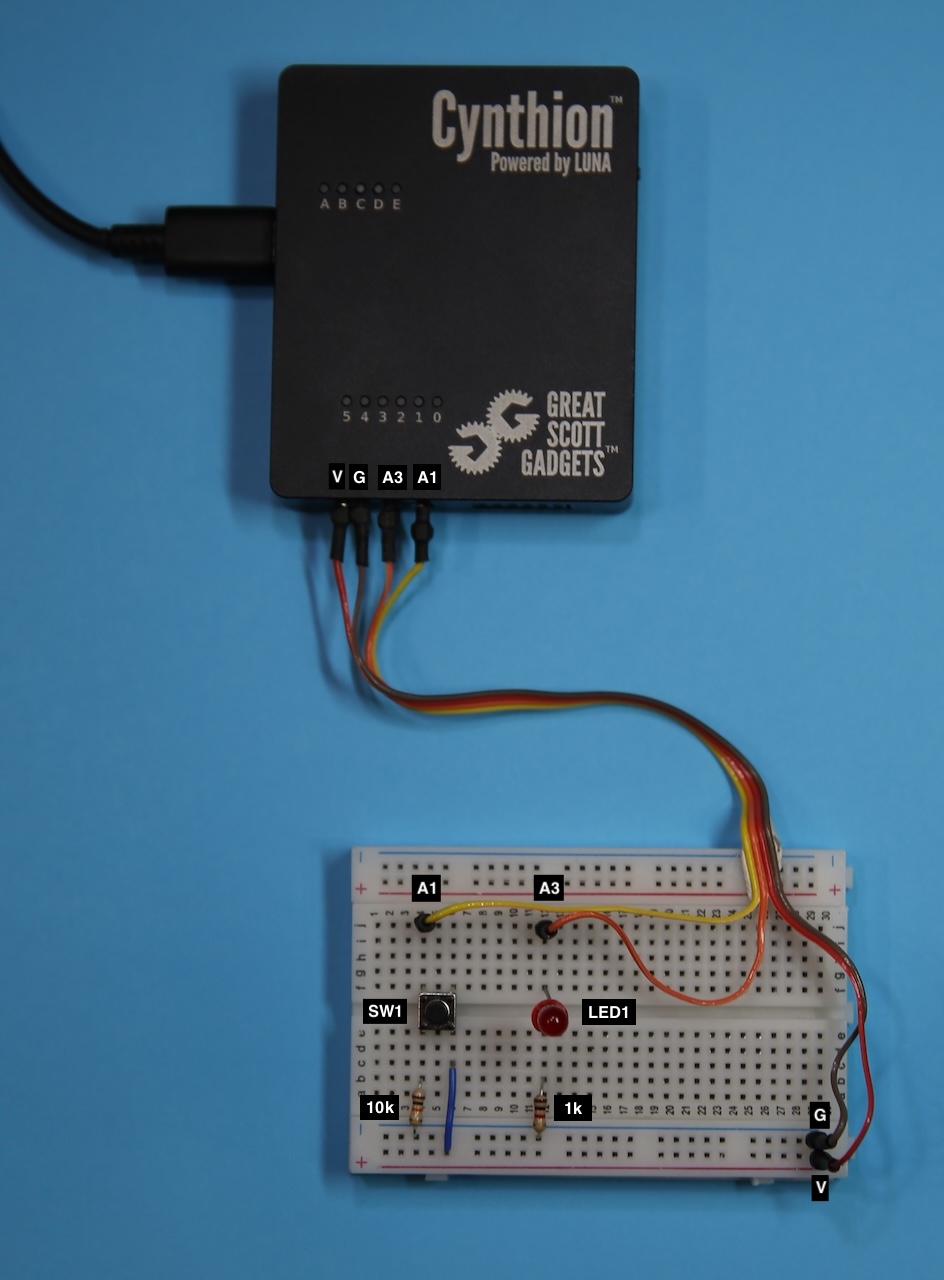
Let’s build a simple example that uses two of the USER Pmod A pins to connect a switch and a LED to Cynthion.

You will need:

  • 1x SPST Switch

  • 1x 1 kOhm resistor

  • 1x 10 kOhm resistor

  • 1x LED

  • 1x Breadboard

Circuit Diagram

Cynthion USER Pmod i/o example circuit diagram.

Breadboard Layout

Cynthion USER Pmod i/o example breadboard diagram.

Source Code

Create a new Python file called cynthion-user-pmod.py with the following content:

cynthion-user-pmod.py
 1import time
 2
 3from cynthion import           Cynthion
 4from cynthion.interfaces.gpio  import PinDirection
 5
 6# Get Cynthion instance
 7c = Cynthion()
 8
 9# Get USER Pmod Pin A1 and configure it as an input
10a1 = c.gpio.get_pin("A1")
11a1.set_direction(PinDirection.Input)
12
13# Get USER Pmod Pin A3 and configure it as an output
14a3 = c.gpio.get_pin("A3")
15a3.set_direction(PinDirection.Output)
16
17# Continuously read the input value of Pin A1 and output it to Pin A3.
18while True:
19    value = a1.read()
20    a3.write(value)
21    time.sleep(0.1)

Open a terminal and run:

python ./cynthion-user-pmod.py

If all goes well, the LED should light up when you press the switch and turn off when you release it.